
Fitting an anchor cleat
Oct 28, 2006 21:00:34 GMT -1
Post by ZEBRA on Oct 28, 2006 21:00:34 GMT -1
Fitting an anchor cleat
This is one of those jobs that take only a few minutes to complete but it does need to be done properly your anchor will only be as good as the cleat and fittings you use I have opted for a standard cleat there are other options i.e. cam cleat but I decided to go with the standard .
Tools you will need .a good fine tipped marker this is a lot more accurate than a standard marker. Philips Screwdriver. Pair of small pliers. Drill and drill bit of suitable size for the bolts. 2 nuts and bolds of correct size and 2 washer’s .and a bit of silicone sealant.
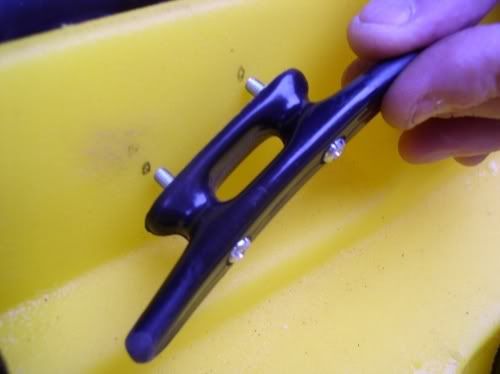
First of all with the nuts and bolts in the cleat decide where you are going to put it and mark thee drill holes.
it is important to spend plenty of time deciding where to put your cleat pay attention to the fact it needs to be in a place that the paddle will not catch when paddling and also needs to be in a place you can reach without stretching all over the place you may need to realise your anchor quickly .it also needs to be in a place that will not catch your hands or cause a problem when being transported on your car no good setting it then finding out it catches the roof rack and gets snapped off. Tuck it in where you can reach it but it does not catch anything.
Anyway after you have marked out the position of the bolts.
Check it again once you have drilled the hole theirs no going back.
Drill the 2 holes and clean out any bits from them.
Then put a liberal amount of silicone on the back of the cleat specially where the bolts threads are then press the cleat and bolts in to place from the inside of the kayak fit the washer to each bolt and then the nuts on .
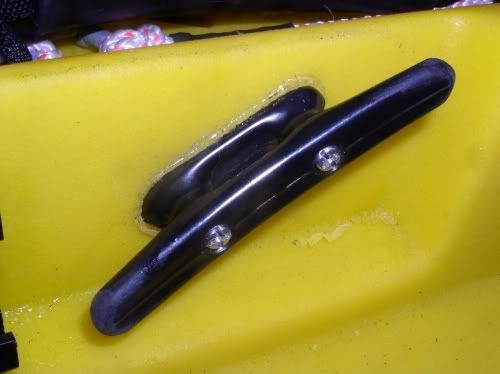
I like to put a small smear of silicone on the thread inside so that when the nut tightens up it forms a small rubber gasket on both inside and outside. finally tighten the nuts up don’t go mad here just get them nice and tight then finally clean off any excess silicone from the outside of the cleat .
[glow=red,2,300]This review is also on the main website north wales kayak fishing [/glow]
northwaleskayakfishing.co.uk/id30.html
This is one of those jobs that take only a few minutes to complete but it does need to be done properly your anchor will only be as good as the cleat and fittings you use I have opted for a standard cleat there are other options i.e. cam cleat but I decided to go with the standard .
Tools you will need .a good fine tipped marker this is a lot more accurate than a standard marker. Philips Screwdriver. Pair of small pliers. Drill and drill bit of suitable size for the bolts. 2 nuts and bolds of correct size and 2 washer’s .and a bit of silicone sealant.
First of all with the nuts and bolts in the cleat decide where you are going to put it and mark thee drill holes.
it is important to spend plenty of time deciding where to put your cleat pay attention to the fact it needs to be in a place that the paddle will not catch when paddling and also needs to be in a place you can reach without stretching all over the place you may need to realise your anchor quickly .it also needs to be in a place that will not catch your hands or cause a problem when being transported on your car no good setting it then finding out it catches the roof rack and gets snapped off. Tuck it in where you can reach it but it does not catch anything.
Anyway after you have marked out the position of the bolts.
Check it again once you have drilled the hole theirs no going back.
Drill the 2 holes and clean out any bits from them.
Then put a liberal amount of silicone on the back of the cleat specially where the bolts threads are then press the cleat and bolts in to place from the inside of the kayak fit the washer to each bolt and then the nuts on .
I like to put a small smear of silicone on the thread inside so that when the nut tightens up it forms a small rubber gasket on both inside and outside. finally tighten the nuts up don’t go mad here just get them nice and tight then finally clean off any excess silicone from the outside of the cleat .
[glow=red,2,300]This review is also on the main website north wales kayak fishing [/glow]
northwaleskayakfishing.co.uk/id30.html